

|
The Aresti 'Aerobatic Diagram' System  General CommentThis is a list of areobatic figures that have common
names. Some of these were invented during aerial combat in WW I.
I have included a short verbal description and the IAC symbol for
each basic figure. There are other figures that are not in the IAC
list of aerobatics figures. These include for instance the Aileron
roll and the Barrel roll. I will try to include some descriptions
of these too as I go along adding figures. Click the "How To" button for a detail
explaination of how to perform some of these maneuvers with your
model. Additonal descriptions will be added in the future. Straight FlightAll maneuvers must end in straight flight. The Aresti will show either upright or inverted flight. Upright & Inverted Flight (K=2) (K=2)  (K=3) (K=3)RollsRolls can be added to most other figures to increase the difficulty factor of the figure. There are two basic types of rolls: slow rolls and snap rolls (flick rolls in european parlance). Slow Rolls (K=10) Fig
2 (K=10) Fig
2 (K=7) (K=7)Slow rolls have to be flown normally on a straight line (exception is the avalanche). The roll rate has to be constant and the longitudinal axis of the plane has to go straight. This requires constantly changing rudder and elevator control inputs throughout the roll. Hesitation or point rolls include stops at certain roll angles. The number on the base of the roll symbol describes the number of points the roll would have if it were a 360 degree roll. Allowed are 2 point, 4 point and 8 point rolls. The fraction on the arrow of the roll symbol describes what fraction of a full roll is to be executed. If no points are specified, rolling is done without hesitations. If no fraction is specified, a roll symbol that starts at the line specifies a half roll (see description of the Immelman). A roll symbol that crosses the line specifies a full roll (first figure). The second figure shows the symbol for 2 points of a 4 point roll (adding up to half a roll) from upright to inverted flight. Snap Rolls (K=13) Fig
4 (K=13) Fig
4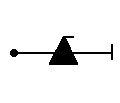 (K=17) (K=17)Snap or flick rolls also have to be flown normally on a straight line. A snap roll is similar to a horizontal spin. It is an autorotation with one wing stalled. Figure 3 shows the symbol for a regular snap roll, figure 4 for an outside snap. In the regular snap, the plane has to be stalled by applying positive g forces. In an outside snap, the plane is stalled by applying negative g. In both cases rudder is then used to start autorotation just like in a spin. Loops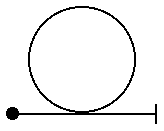 (K=10) (K=10)
This is one of the most basic maneuvers, but not easy to fly well. It has to be perfectly round, entry and exit have to be at the same altitude. The difficulty in flying this manuever well is in correcting for effects of wind drift. In competition, it helps if you don't have to fly first, so you can watch what your competitors are doing and judge the wind drift that you have to take into account. The maneuver starts with a pullup. Once past the vertical, the back pressure on the elevator is slowly relaxed to float over to top of the loop to keep it round. Past the top, the back pressure is slowly increased again throughout the back part till horizontal flight. The plane has to stay in one plane with the wings horizonal to the flight path. Rudder is used to maintain the plane of the figure and ailerons are used to maintain the orientation of the wings. Avalanche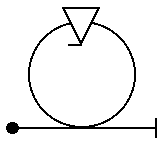 (K=21) (K=21)
This is the basic loop with a roll (usually a snap roll) at the top of the loop. The roll has to be centered at the top of the loop. Square Loop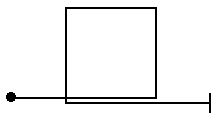 (K=14) (K=14)
This is a variation of the basic loop. The two vertical lines and the horizontal line on top have to be of the same length. The exit line at the bottom has to be at least as long as the other three sides. The quarter loops that connect the four sides have to have the same radius at each corner. Eight Sided Loop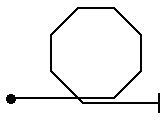 (K=19) (K=19)
This is another variation of the basic loop. The two vertical lines, the 45 degree lines and the horizontal line on top all have to be of the same length. The exit line at the bottom has to be at least as long as the other seven sides. The eight loops that connect the eight sides have to have the same radius at each corner. Immelman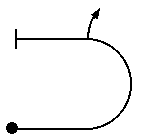 (K=10) (K=10)
The figure starts with a half loop to inverted flight. A half roll then results in horizontal upright flight. This is one of the maneuvers that have been used in WW I to reverse direction. This maneuver does not preserve speed and altitude. It trades speed for altitude. Split-S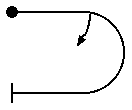 (K=10) (K=10)
The figure starts with a half roll to inverted followed by the second half of a loop downward. This is another maneuver to reverse direction. This one, like the immelman, does not preserve speed and altitude. In this case it trades altitude for speed. English Bunt (K=8) (K=8)
This figure also is the second half of a loop downward, this time an outside loop. You push forward and fly the second half of an outside loop till you are in horizontal inverted flight. Make sure you are not too fast going into the maneuver, otherwise you may exceed redline speed. Cuban Eight ManeuversCuban Eight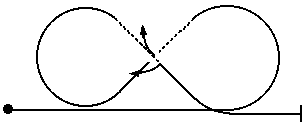 (K=29) (K=29)
Two Half Cuban Eights can be combined to form a Cuban Eight or Lay-down Eight. In this figure in competition the two looping parts have to be flown at the same altitude with the same radius. The exit has to be at the same altitude as the entrance to the figure. Reverse Cuban Eight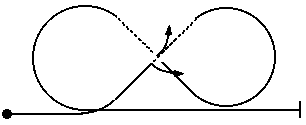 (K=29) (K=29)
Like the Cuban Eight, a Reverse Cuban Eight can be formed by flying two Reverse Half Cuban Eights back to back. Half Cuban Eight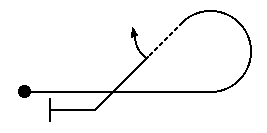 (K=14) (K=14)
Five-eighths of a loop to a down-line at a 45 degree angle. The plane is inverted at this point. Centered on this downline is a half roll from inverted to upright. A pullout to horizontal completes the figure. This is another one of the maneuvers that reverse direction. The downline can be used to adjust the altitude and speed at the end of the figure. Reverse Half Cuban Eight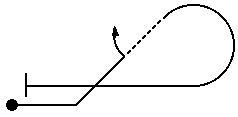 (K=16) (K=16)
This figure starts with a pull to a 45 degree up-line. Centered on this line is a half roll from upright to inverted. Five-eighths of a loop complete the figure to horizontal flight. This again is one of the maneuvers that have been used to reverse direction while preserving altitude and airspeed. Inside-Outside Eight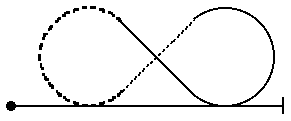 (K=20) (K=20)
This figure is similar to a Full Cuban Eight, but it does not contain any rolls. The second loop is an outside loop. Again, the two loops have to have the same radius and have to be flown at the same altitude. Entry and exit have to be at the same altitude. Hammerhead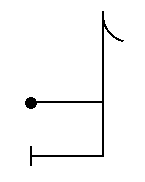 (K=17) (K=17)
It starts with a quarter loop into a vertical climb. When the plane stops climbing, it pivots around its vertical axis (which is now horizontal).The nose moves in a vertical circle from pointing up through the horizon to pointing down. After moving vertically down to pick up speed again, the maneuver is finished with the last quarter of a loop to horizontal flight. This figure can have optionally rolls on both the up-line and the down-line. The quarter loop is flown just like the first part of a loop. When the plane is vertical, the elevator backpressure is released completely. During the vertical line up, some right aileron and right rudder is needed to maintain the vertical attitude because of the engine torque and p-factor. When the plane has slowed enough, full rudder initiates the turnaround. It is followed by right-forward stick (right aileron and forward elevator) to keep the plane from torquing off. The pivot is stopped with opposite rudder when the nose points straight down. When the pivot is completed, the ailerons and rudder are neutralized. Elevator and rudder are used to keep the nose pointing straight down. The pivot must be completed within one wingspan. Rolls on the downline require only aileron input if the plane is trimmed correctly. This maneuver is sometimes called a hammerhead stall. This is not an accurate name because the airplane never stalls. The airspeed may be very low, close to zero, but since there is no wingloading during the turn-around, there is no stall (at zero g wing loading, a wing does not stall). The plane is flying throughout the maneuver with all the control surfaces effective (although sometimes only marginally so). This also is one of the maneuvers that have been used to reverse direction while adjusting altitude and airspeed by changing the length of the down-line. Tailslides (K=15) (K=15) 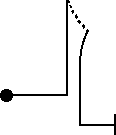 (K=15) (K=15)
These maneuvers involve bringing the airplane to a complete stop in a vertical attitude and then sliding back a visible amount. The airplane must then tip over and fall through a vertical down position. The left figure indicates a tailslide with the wheels down during the flip, the right figure is a tailslide with the wheels up (inverted) during the flip. Going into the figure and coming out, the same rules apply as for other figures (quarter loops of constant and equal radius, vertical lines). Humpty-Bump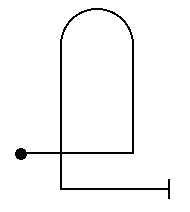 (K=13) (K=13)
The figure starts with a quarter loop to a vertical climb. A half loop then results in a vertical down-line. The figure completes with another quarter loop to horizontal flight. The looping part on the top of the figure does not have to be the same radius as the two other looping portions (the quarter loops going into and coming out of the humpty). Again the figure can have optionally rolls on both the up-line and the down-line. TurnsCompetition Turn (K=5) (K=5)
Competition turns are not the coordinated maneuvers that you use in normal flying. In a competition turn you first roll to the desired bank. It has to be at least 60 degrees. My experience shows that the steeper the bank, the better the scores. I try to get close to 90 degrees bank. Once the bank is established the turn is started. The plane has to maintain a constant bank and altitude throughout the turn. At the end of the turn the turn is stopped and then the wings leveled for horizontal flight. The example shows the symbol for a 270 degree turn. Rolling Turn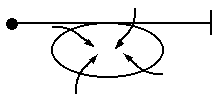 (K=20) (K=20)
This maneuver combines a turn with rolls. The example shows a 360 degree turn with four rolls to the inside. The plane has to maintain a constant roll rate, constant turn rate and constant altitude throughout the rolling turn. This maneuver is quite difficult to fly. It requires constantly changing inputs from all three controls (rudder, aileron, elevator). Spin (K=14) (K=14)
 (K=18) (K=18)
Spins also are aerobatics competition maneuvers. The two figures show a regular and an inverted crossover one turn spin. Spins come in 3/4, one, 1 1/4 and 1 1/2 turns. During spin entry, the plane has to show a stall break, followed by the auto-rotation. The rotation has to stop exactly after the specified number of turns. Once the rotation has stopped, a vertical downline has to be established. In a crossover spin, the plane is first stalled upright. At the stall break, the nose is pushed forward to get into an inverted spin while maintaining the stall. The inverted spin is then completed as it would be for an inverted spin with entry from inverted flight.  |